


In this article, I will show you step by step process of pressure gauge calibration using a dead weight tester.
Introduction
Dead weight testers are widely used as a calibrating instrument for calibrating pressure sensing instruments like pressure gauges and sometimes pressure transmitters too.
Dead weight testers come under the category of standard calibrating instruments. A deadweight tester can be used to generate pressure up to 60,000 psi.
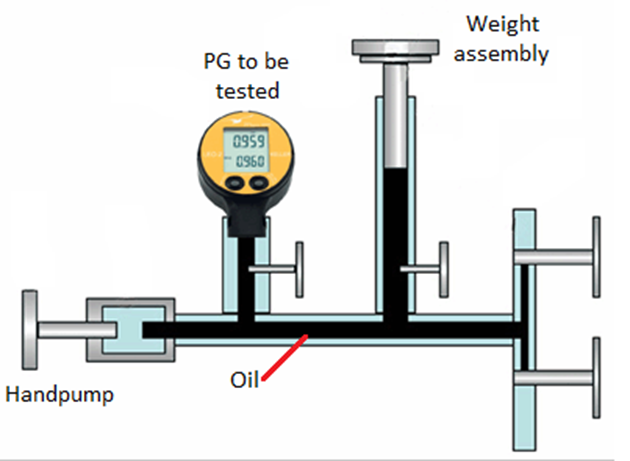
As seen in the figure, a dead weight tester has a piston cylinder-type assembly. A hand pump is provided which pressurizes the oil filled in the chamber which is also called an oil reservoir.
An assembly for putting weight is also provided. Isolation valves are given to isolating the pressure gauge as well as the weight assembly.
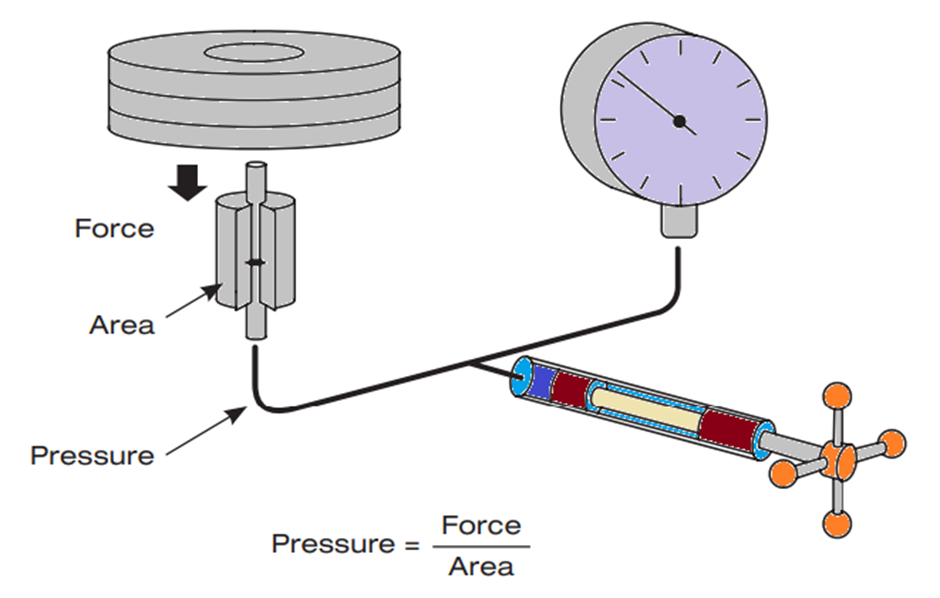
The principle of a dead weight tester is very simple. A weight placed on an area will exert force. And force per unit area is pressure.
How to calibrate a Pressure gauge?
Here is a Step by step guide for how to calibrate the pressure gauges using a dead weight tester.
- Check the oil level in the chamber. If the oil level is not ok, then refill the oil.
- Mount the pressure gauge to be calibrated on the slot given for mounting after removing the air in between the pressure gauge tapping and pressure gauge connection.
- Now put the appropriate weight on the weight assembly. Appropriate weight means for every pressure value, there is a defined weight for a given dead weight tester. So, select the weight and place the weight on the weight assembly.
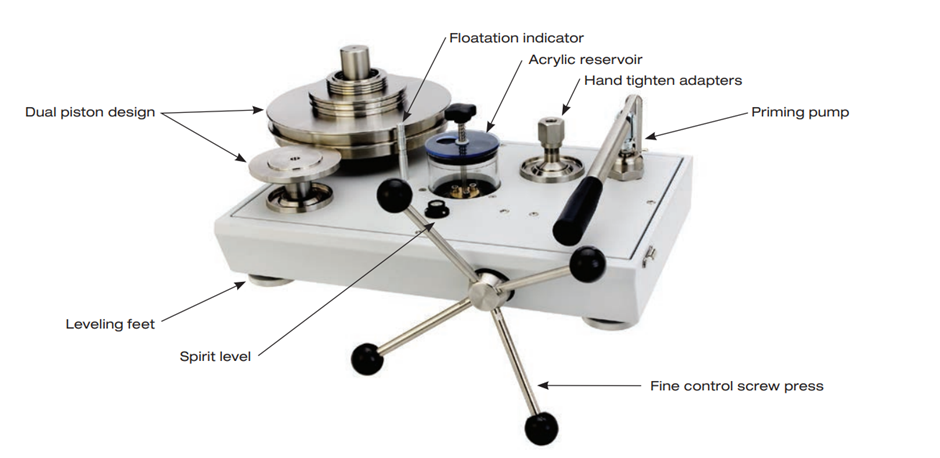
- Now, start applying the pressure through the priming pump and fine adjust using the fine control screw press until the weight assembly starts floating between the limits marked on the weight assembly.
- When the weight starts floating between the limits marked below the floating weight assembly, the same amount of pressure is applied to the pressure gauge. Different weights are available for calibrating different ranges.
- Now rotate the disc on which the weights are put. Rotating the discs will eliminate the static errors due to any frictional force.
- If the disc is above the limits, then decrease the pressure.
- If the disc is below the limits, then increase the pressure.
- For changing the weight by removing the weights which are on the disc, first, de-pressurize the system and then remove the weights. Removing the weights while the system is pressurized will damage the deadweight tester.
Resources
And recently, I also found this interesting free book on Calibration technology by WIKA
Calibration Technology
EndNote
I hope these resources and Knowledge will become helpful to you in the future. And I continue to make this type of resource and knowledge-sharing posts on my website.
If you have any suggestions then feel free to ask in the comments and through email id, if you want to write an article on the website, please contact us by this mail id: contact@worldofinstrumentation.com
If you like this post you can also like my previous article on Ultrasonic vs Radar Level Measurement.
And you can also follow our LinkedIn group which is specially made for sharing information related to Industrial Automation and Instrumentation.